Features and Functions of GIM
Tier Change
Use the Tier Change tool when you upgrade an instrument from version 6 to version 7 software, or when you buy an instrument upgrade. Do the following:
-
- Click the Change Tier button, which is located in the Device Info section of GIM.
-
- A pop-up box appears asking you if you want to proceed. Click the Yes button.
-
- The Authorization Code Entry window appears. This consists of a drop-down Package menu and the Authorization Code field. Choose the package to which you will be upgrading in the Package menu, and then enter the corresponding ten-digit Authorization Code. Gamry gives you the Authorization Code. Click the OK button.
- A status box opens and the instrument restarts. When this is complete the instrument is at the new tier.
Firmware Update
When an instrument is upgraded from version 6 to version 7 software, or when a new version of version 7 is installed, a firmware update may be required. If the firmware version on the instrument is not compatible with the version of software, the instrument will not function properly.
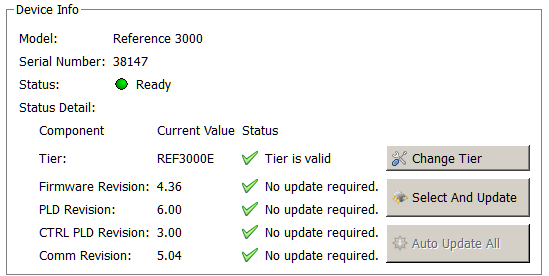
GIM automatically determines if the software and firmware are compatible. The status of compatibility is shown in the Device Info area.
If there is a conflict, this area shows the following:
If the firmware is compatible with software version, the Device Info area appears as:

NOTE: Gamry Instruments does not recommend altering the firmware versions unless necessary.
Auto Update All
**RECOMMENDED**
If no updates are required to use the instrument, this tool is grayed out. When one or more of the firmwares are incompatible, the Auto Update All button is active. This tool automatically selects the compatible firmwares and installs them. To use this tool, take the following steps:
NOTE: Do not power off or disconnect the instrument during this process. Doing so can cause irreversible damage to the instrument.
- Click the Auto Update All button
- A window appears giving information on what version of firmware is currently installed, and what version will be installed. The install process starts automatically.
- After all the relevant firmwares are updated, a window appears confirming the process is complete and successful.
- Click the OK button. The instrument is now ready to be used.
Select And Update
The Select and Update option is available at all times, even if an update is not required. Gamry recommends not altering the firmware if it is not necessary. This tool allows you to change individual firmwares (instrument, PLD, Comm).
NOTE: Please contact Gamry before making unnecessary modifications to the firmware.
Calibration
Calibration can be initiated through Framework™, or directly through GIM. Gamry recommends calibrating the instrument at least once per year, or when the quality of your data is in question. To initiate calibration take the following steps:
-
- Click the Calibrate in Framework button, located in the Calibration area of GIM
- This launches the appropriate calibration routine for the instrument selected in GIM
- Follow the instructions given in Framework. See the relevant Calibration Quick Start Guide for additional details.
If there are any failures during calibration, click the Email Results to Gamry Support button in GIM. One of our support engineers will review the results and provide appropriate advice.


Comments are closed.