Adding a Temperature Controller
NOTE: The Gamry Framework™ installation program makes the appropriate entries into the GAMRY.INI file. Follow these steps only if you wish to make a change manually.
These instructions tell you how to identify and configure your temperature controller via entries in the GAMRY.INI file. These instructions assume that your system contains only one temperature controller.
If you need to setup the software for multiple temperature controllers, contact Gamry Instruments technical support.
Open the GAMRY.INI file in Windows® Notepad.
For TDC4 temperature controller
If you have a TDC4 Temperature controller, add a new section of the form:
[TDC_1]label = TDC4port = Xmode = comX:2400,0,7,1serialno = xxxxxtype = 4In the above program code, X is the number of the COM port used to connect to the TDC4, e.g., COM2. When you type the lines, replace X with this number. The communications parameters are the default parameters for the TDC4.
For a TDC5 temperature controller
If you have a TDC5 Temperature controller, add a new section of the form:
[TDC_1]
label = TDC5
port = X
mode = comX:9600,N,8,1
serialno = xxxxx
type = 5
In the above program code, X is the number of the COM port used to connect to the TDC5, e.g., COM2. When you type the lines, replace X with this number. The communications parameters are the default parameters for the TDC5.
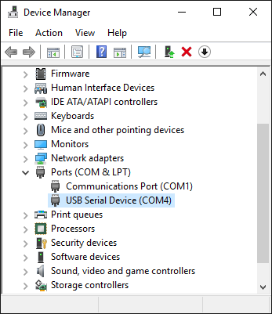
Check that the COM port shown in Device Manager matches what is in your .INI file:
- After the TDC5 is plugged into an available USB port on the host computer, turn on the host computer.Log into your user account.Run Device Manager on the host computer.
In Windows® 7, you can find Device Manager in the Control Panel. In Windows® 10, you can find it by searching in the Windows® search box.
- Expand the Ports section in Device Manager as shown.

- Turn on the TDC5 and look for a new entry that suddenly appears under Ports.
- This entry will tell you the COM number associated with the TDC5. Take note of this for use during installation of the Gamry Instruments software.
- If the COM port is higher than number 8, decide on a port number less than 8.
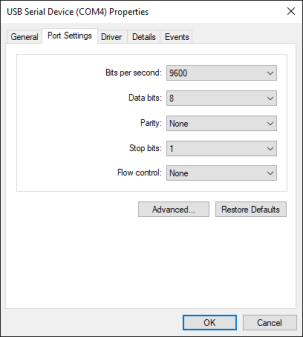
- Right-click on the new USB Serial Device that suddenly appeared, and select Properties.
- A USB Serial Device Properties window like the one shown appears.

- Select the Port Settings tab.
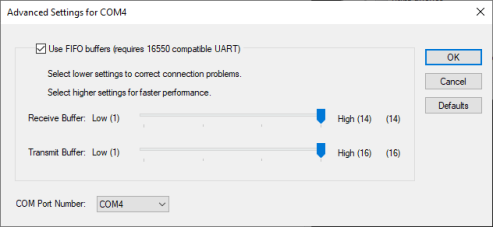
- Click the Advanced… button.
- The Advanced Settings for COMx dialog box appears as shown. (Here x stands for the particular port number you have chosen.)

- Select a new COM Port Number from the drop-down menu.
- Select a number of 8 or less. You do not need to change any other settings.
- Click the OK buttons on the two open dialog boxes to close them.
- Close the Device Manager by clicking the X in the upper right-hand corner.

Comments are closed.