Galvanostatic Intermittent Titration Technique (GITT) Set-up Parameters
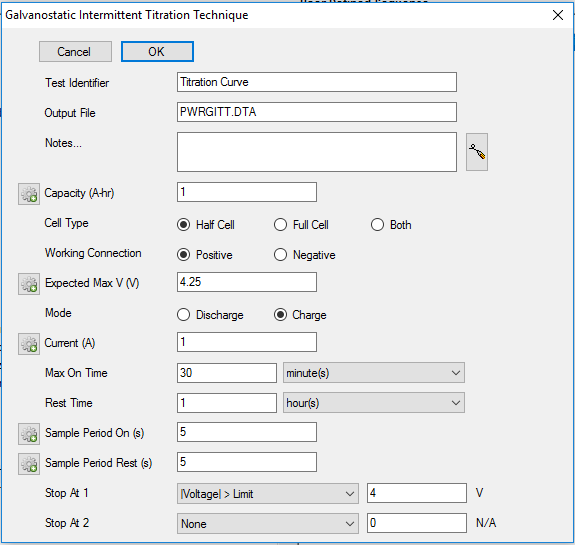
To change parameters in a GITT experiment, click the script in the User Defined Sequence column. The Setup Parameters window appears:

Test Identifier
- A string that is used as a name. It is written to the data file, so it can be used to identify the data in database or data manipulation programs.
- The Identifier string defaults a name derived from the technique’s name. While this makes an acceptable curve label, it does not generate a unique descriptive label for a data set.The Identifier string is limited to 80 characters. It can include almost any normally printable character. Numbers, upper- and lower-case letters, and most normal punctuation characters including spaces are valid.
Notes
- Enter several lines of text that describe the experiment. A typical use of Notes is to record the experimental conditions for a data set.
![]()
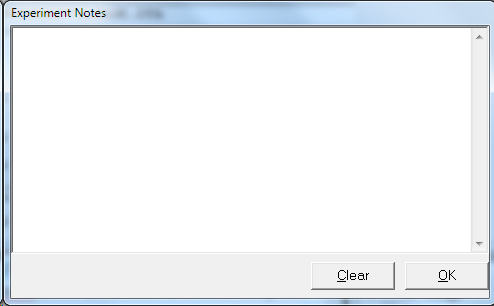
- To the right hand side of the notes is a button. This button allows you to open theExperiment Notes dialog box, shown below, which shows more of the notes at one time.

- You can edit the notes in either place.
- Notes defaults to an empty string. The Notes string is limited to 400 characters. It can include all printable characters including numbers, upper- and lower-case letters, and the most normal punctuation including spaces. tab characters are not allowed in the Notes string. You can divide your Notes into lines using enter.
Capacity
- Specifies the capacity—the amount of charge needed to charge or discharge a battery—to be recorded. This value is not used during the experimental phase, but rather during the analysis where a percent capacity graph can be displayed. The units for this parameter are ampere-hours (Ah).
Cell Type
- An optional parameter only displayed if a Reference 3000 or Interface 5000 is present.
Half Cell radio button
- When the cell type is half-cell, the instrument measures the voltage between the working sense lead (blue) and the reference lead (white). This is the normal electrometer. The maximum measurable voltage in half-cell mode varies by instrument. See the manual for your instrument and the specifications for the electrometer.
Full Cell radio button
- Full Cell mode is generally used to test a single-cell electrochemical device. The test assumes a two-electrode cell. The positive terminal of the cell is connected to the potentiostat’s working (green) and working sense (blue) leads. The negative terminal of the device is connected to the potentiostat’s counter (red) and reference (white) leads. The Electrochemical Energy software displays an error message if the Working Lead parameter is set to Negative. Connect the potentiostat’s counter sense (orange) lead to the cell cable’s ground (black) lead.
Both radio button
- Both mode is only used for the Interface 5000 dual-electrometer mode. It measures the voltage difference between the reference lead (white) and both sense leads (blue and orange).
Working Connection
- Specifies how the potentiostat is connected to the electrochemical cell.
- When the working connection (green) is connected to the positive electrode (discharge cathode) of the electrochemical cell, select thePositive radio button for this parameter. When the working lead is connected to the negative electrode (discharge anode) of the electrochemical cell, select the Negative radio button for this parameter.
- In general, we recommend Positive.
Mode
- Determines the polarity of the current pulses being applied.
Current
- Defines the value, in amperes, for the magnitude of the current pulse.
Max On Time
- Duration for each current pulse to be applied. Typically 10–15 minutes.
Rest Time
- Duration for each rest portion of the experiment. Typically 10–15 minutes.
Sample Period On
Rate at which the potentiostat will record data during the current pulses, in seconds.
Sample Period Rest
- Rate at which the potentiostat will record data during the rest periods, in seconds.
Stop At On 1, Stop At On 2
- Allow you to specify various limits to an experiment. The limit, if met, causes the experiment to skip to the next step, or stop if there is no subsequent step.

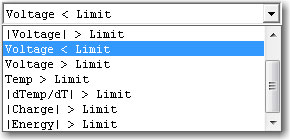
- Most experiments have Stop At On 1 and Stop At On 2. These parameters are treated equally, and if both are used, they are both tested on every raw data point. If either limit is reached, the experiment skips to the next step or stop.The available stop tests are shown in the drop-down list below.

- Different experiments allow different tests, but the principles that govern their behavior are the same. After you choose a limit, the appropriate units for entry of the limit are shown to the side of the limit-value entry box as depicted below.
![]()
- When a voltage limit is selected, the entry units are Volts. When a temperature limit is selected, the entry units are Celsius.
![]()
- The available stop tests are:
None
- No stop test specified. The experiment runs until the maximum specified time.
Voltage
Voltage < Limit Stop if measured voltage is less than the value entered in V.
Voltage > Limit Stop if the measured voltage is greater than the value entered in V.
|Voltage| < Limit Stop if the absolute value of the measured voltage is less than the value entered in V.
|Voltage| > Limit Stop if the absolute value of the measured voltage is greater than the value entered in V.
|dV/dT| < Limit Stop if the absolute value of the measured voltage change rate is less than the value entered in V/s.
|dV/dT| > Limit Stop if the absolute value of the measured voltage change rate is greater than the value entered in V/s.
Current
Current < Limit Stop if measured current is less than the value entered in A.
Current > Limit Stop if the measured current is greater than the value entered in A.
|Current| < Limit Stop if the absolute value of the measured current is less than the value entered in A.
|Current| > Limit Stop if the absolute value of the measured current is greater than the value entered in A.
|dI/dT| < Limit Stop if the absolute value of the measured current rate of change is less than the value entered in A/s.
|dI/dT| > Limit Stop if the absolute value of the measured current rate of change is greater than the value entered in A/s.
Temperature
Temp > Limit Stop if measured temperature is greater than the value entered in °C.
|dTemp/dt| > Limit Stop if absolute value of measured temperature change is greater than the value entered in °C/min.
Charge and Energy
|Charge| > Limit Stop if absolute value of accumulated charge is greater than the value entered in A-h. |Energy| > Limit Stop if absolute value of transferred energy is greater than the value entered in J.

Comments are closed.