Ru Estimation Setup Parameters
Click on each of the setup parameters for a description of its use and function.
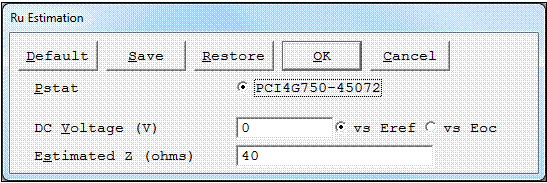
Default button
Restores all the parameters on the screen to their default values. Use it to fix typing errors or find out previous values for a parameter you have already retyped. The default values are the values as specified by the Explain™ script. All of the standard scripts perform an automatic restore of the last used values. These are the values first shown to the user. In order to get to the values specified by the script, use the Default button.
Save button
Save the current parameter set on your disk. This is very useful when you are running repetitive tests. Parameter sets are stored in a file with a .SET file-name extension. More than one parameter set can be stored in each file, with the set distinguished by a Set Name. This system is a powerful tool for organizing your experimental setups. For example, each worker in a lab can have his own setup file (JOE.SET, KAREN.SET, etc.). Within her file, Karen can save multiple parameter sets under descriptive Set Names (C1010 Noise, Fast Noise, etc.).
Clicking Save opens a dialog box which requests the name of the file where you wish to save the parameter set, and the Set Name within in the file. Once you are satisfied with the names, clicking the OK button saves the set in the specified file.
Restore button
Recovers a parameter set from your disk. This is useful when you are running repetitive tests. Clicking Restore opens a dialog box which requests the name of the file where your parameter set has been saved, and the Set Name within the file. Once you are satisfied with the names, clicking the OK button recalls the set from the specified file.
Pstat
Selects the potentiostat/galvanostat/ZRA to perform the experiment. Each labeled radio button corresponds to an installed potentiostat. When you choose a potentiostat, its corresponding radio button is filled in. In a multiple-potentiostat system, you can change the potentiostat selection by clicking on a Pstat’s radio button using the mouse. From the keyboard, tab down until a dotted line appears around one of the Pstat labels, then hit the space bar to select among the potentiostats. Only one potentiostat can be selected at a time, so selecting one potentiostat de-selects another one.
DC Voltage (V)
The constant potential applied to the cell throughout the scan.
Estimated Z
A user-entered estimate of the cell’s impedance. It is used to limit the number of trials required before acquiring the first data point in an impedance spectrum. Before taking the first data point, the EIS software sets up the potentiostat and FRA to measure an impedance equal to Estimated Z and tries to measure the cell’s impedance. If the estimate is fairly accurate, the first (or second) attempt to measure the impedance succeeds. If the estimate is poor, the system may take up to five trial readings before it finds the correct settings. It is generally sufficient if Estimated Z is within a factor of 5 of the cell’s impedance.
After the first data point, the last measured impedance is used to calculate new measurement settings, so the entered Estimated Z becomes unimportant.
An accurate Estimated Z is more valuable when the initial frequency is low. Remember, 1 mHz is 1000 seconds per cycle. Each impedance reading requires at least three cycles at a given frequency, so five readings to find a range at 1 mHz will take over 4 hours!
The units for Estimated Z are ohms. There is no reason to enter values larger than 1 TΩW (1012Ω or smaller than 0.01 Ω, because these values drive the system settings to their most sensitive and least sensitive settings, respectively.
Comments are closed.