Description
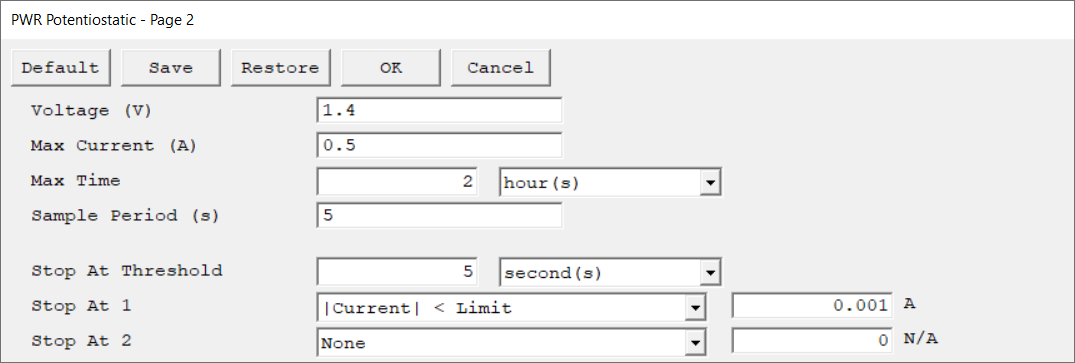
Second setup page of the Potentiostatic experiment. Press OK to continue or Cancel to go back to the first setup page.
Parameter |
Description |
Units |
|||||||||||||||||||||||||||||||||||
|---|---|---|---|---|---|---|---|---|---|---|---|---|---|---|---|---|---|---|---|---|---|---|---|---|---|---|---|---|---|---|---|---|---|---|---|---|---|
The constant voltage applied to the working electrode during the measurement. |
volts (V) |
||||||||||||||||||||||||||||||||||||
Max Current controls the current measurement range if I/E Range is set to Fixed mode. If I/E Range is set to Auto mode, Max Current specifies the maximum expected starting current.
To avoid overloading the instrument (so you can accurately track the total charge passed), set Max Current to a value below the instrument's maximum current capabilities.
|
amperes (A) |
||||||||||||||||||||||||||||||||||||
Specify the maximum time of the experiment. The first field specifies the value. Select the unit from the drop-down list. |
seconds (s), minutes (min), hours (hr), days (d) |
||||||||||||||||||||||||||||||||||||
The spacing between data points. The shortest Sample Period we recommend is 0.5 s (50 ms). The longest Sample Period allowed is 715 s for Reference potentiostats and 750 s for Interface potentiostats.
|
seconds (s) |
||||||||||||||||||||||||||||||||||||
The time tolerance of the Stop At conditions. A Stop At condition must be true for at least the set duration before the experiment ends.
For example, if the threshold is set to 5 s and Stop At 1 is set to |Voltage| > Limit of 4.2 V, the cell voltage must exceed 4.2 V for a minimum of 5 s for the experiment to end. Set the threshold to 0 s if you want the experiment to end immediately after a Stop At condition is met. |
seconds (s), minutes (min), hours (hr), days (d) |
||||||||||||||||||||||||||||||||||||
Specify various limits to an experiment. Choose a limit criterion from the drop-down list and enter a limit value. The unit automatically updates according to the criterion. The limit, if met, causes the experiment to skip to the next step, or stop if there is no subsequent step.
Most experiments have Stop At 1 and Stop At 2 criteria. These parameters are treated equally, and if both are used, they are both tested on every raw data point. If either limit is reached, the experiment skips to the next step or stops entirely.
|
|
||||||||||||||||||||||||||||||||||||
An optional parameter that appears only if an instrument with the Auxiliary Electrometer option is connected. If your instrument does not include the AE feature, this configuration parameter will not be visible.
This parameter consists of checkboxes that allow to select which channels are active during the experiment. Click the All button to select, or None to deselect all channels.
There is a Set Limits checkbox available for some experiments. It opens a secondary AE Channel Limits window where limits for the individual AE channels can be entered. The checkbox for each AE channel turns the limit-checking on for that channel. The Under (V) parameter tests for voltages less than the entered value. The Over (V) parameter tests for voltages above the entered value. If the measured value on an AE channel exceeds one of these limits, the experiment skips to the next step or ends if there is no next step. |
|

