Description
Like the Critical Pitting Potential experiment (ASTM Standard F746), THE Method involves a Stimulation phase and a Repassivation phase.
Run the THE Repassivation Potential standard technique by selecting Experiment > DC Corrosion > THE Repassivation Potential from the Framework™ menu bar. This initiates the following sequence of events:
1.Framework™ creates a Runner window, and the Repassivation Potential.exp script is run in this window.
2.The script creates the Setup dialog box and accepts changes in the experimental parameters.
3.The script now obtains the use of the potentiostat specified during Setup and opens the data file using the Output name. If the potentiostat is in use or the file cannot be opened, the script returns you to the Setup dialog box. The file header information is written to the data file. This information is written to the file prior to data acquisition. If the experiment is aborted, the file contains only this information. This header information includes:
•Tags identifying possible analyses.
•The current time and date.
•A list of the Setup parameters.
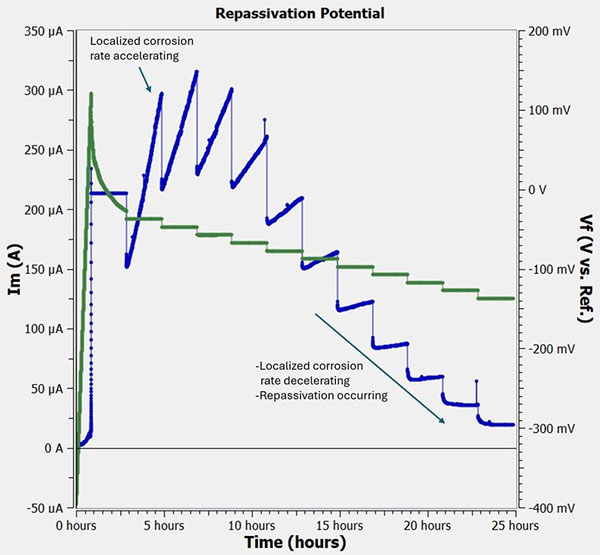
4.The Stimulation phase begins with a potentiodynamic ramp towards more anodic potentials. The ramp stops when the current reaches a critical threshold (20 μA/cm2), indicating that crevice corrosion has been initiated.
5.The Stimulation phase continues with the sample then galvanostatically held at this current density for a fixed time (2 hours). At the end of this galvanostatic hold, the potential is measured.
6.The test then enters the Repassivation phase. The cell is returned to potentiostatic control at the last potential measured in the Stimulation phase. The potential is then stepped towards the original open-circuit potential in 10 mV increments. During these potentiostatic steps a current-versus-time curve is measured. If the current continues to increase, that is an indication that crevice corrosion is continuing. If the current does not increase when the potential is held for two hours, then the Repassivation potential has been reached.

Potentiodynamic scan for THE Method. Potential is green, and current is blue.
7.The data are written to the output file, and the script cleans up and halts.
8.When the scan is over, the cell is turned off. The acquired data are written to the output file.
9.The script then waits for you to click the F2-Skip button. When you do, the script closes everything that is open, including the Runner window.