Description
To access an experiment in the Gamry Framework® software, go to the menu under Experiment menu. Here you have three options to run an experiment:
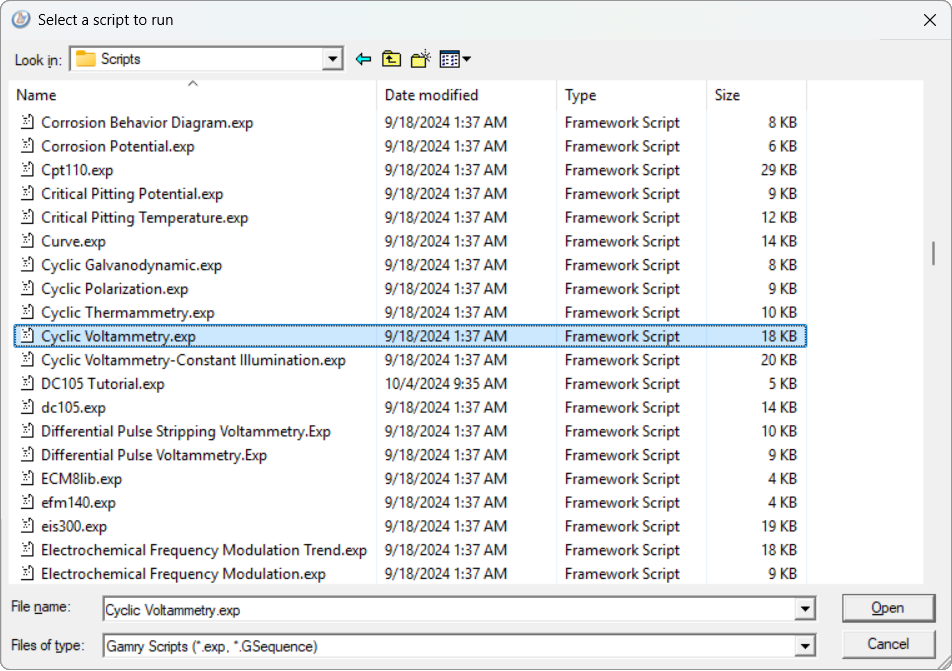
1.Click on Named Script.... This opens the Select script to run dialog box.
The directory contains all Gamry Script files as well as their sub-scripts. These experimental files have the extension *.exp.
|
You can open any *.exp script file in a text editor for modifying. However, be careful when editing or deleting any of these files as it may break other scripts. |

|
You can change the default file path under Options > Path.... |
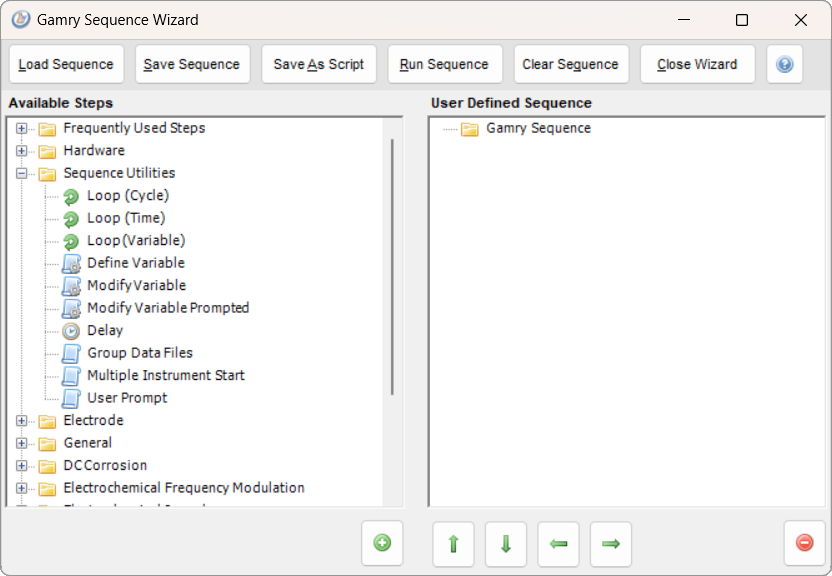
2.Click on Sequence Wizard. A separate Gamry Sequence Wizard opens.
The Sequence Wizard enables building custom experiment sequences and includes additional utilities to add even more flexibility. A detailed discussion on the various functions and tools can be found here.
3.The third and generally most convenient method is to look at the bottom half of the Experiment menu where all standard electrochemical scripts are grouped.
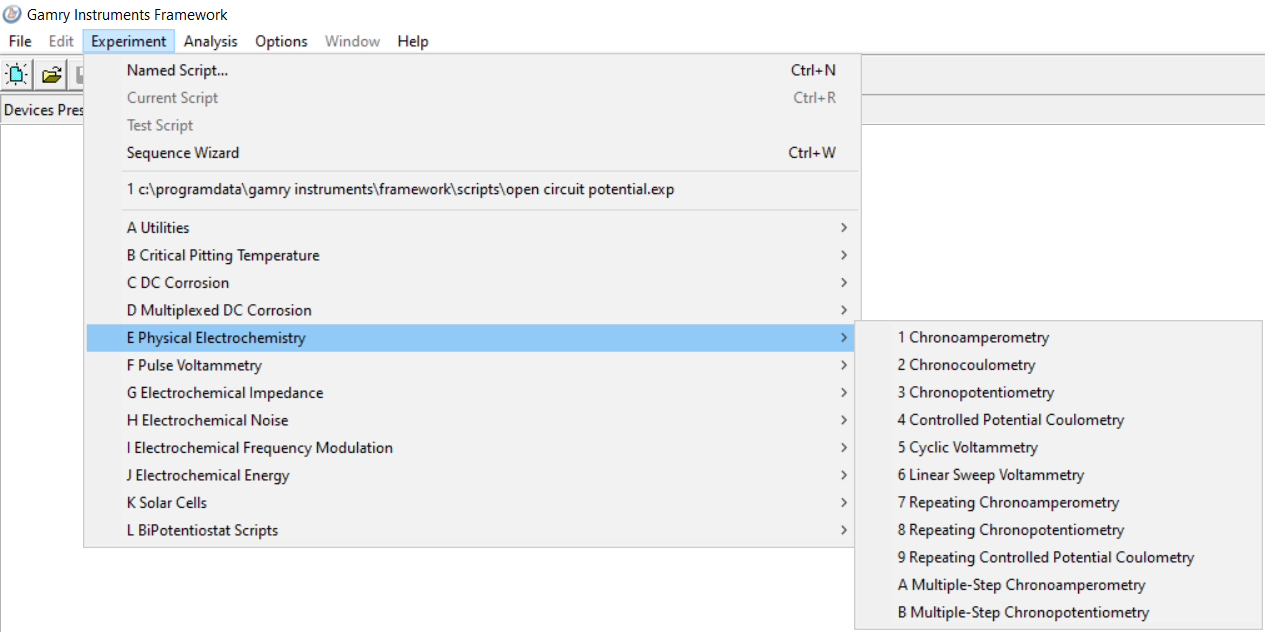
There are currently twelve different groups available, sorted by their application and the experiment type.
Description |
Script |
|---|---|
General-purpose routines such as calibration and instrument configuration. |
|
Experiments for the study of pitting corrosion phenomena. |
|
Set of tools for corrosion testing. |
|
Tools for corrosion testing with a Multiplexer. |
|
Basis electrochemical experiments for a variety of applications. This group includes techniques such as linear sweep voltammetry, cyclic voltammetry, and various chrono techniques. |
|
Electrochemical pulse techniques for studying fast timescale electroactive species. |
|
Single-sine, multi-sine, and single-frequency EIS experiments. |
|
Test methods to study electrochemical noise. |
|
EFM scripts for corrosion testing. |
|
Tools for testing energy devices such as batteries, capacitors, or fuel cells. |
|
Scripts that combine the control of a light source and electrochemical tests on DSSCs. |
|
Special script for bi-potentiostat experiments. |
|
These experiment groups do not list all Gamry Script files but only the standard and most commonly used experiments. Go to Named Script... to gain access to all experiment files. |
|
Depending on the potentiostat's tier, not all experiment may be available for use. Please see following links on the potentiostat capabilities and how to change the tier of your potentiostat. |
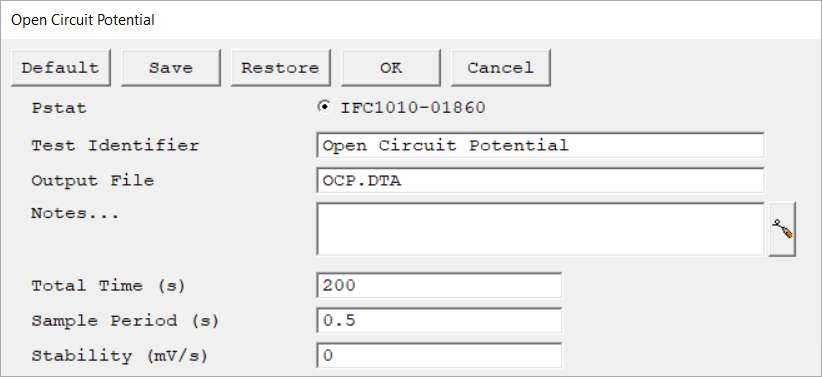
Enter parameters
After selecting an experiment, the Setup dialog box opens. It contains the setup parameters necessary to run this particular experiment. The example below shows the setup for a simple Open Circuit Potential experiment.
When you set up one of the standard experiments, there are five buttons at the top of the setup dialog box. They are independent of which technique you are setting up and control the setup box itself and the saving/recalling of parameter sets from your computer's hard drive.
Reset all parameters on the screen to their default values. This is useful for correcting typing errors or retrieving previous values for a parameter you already modified.
The default values are those specified by the Explain script. All standard scripts automatically restore the last used values, which are the ones initially displayed to the user. To revert to the original script-specified values, use the Default button. |
|||
Save the current parameter set to your computer. This is useful when you are running repetitive tests. Parameter sets are stored within a setup file with a *.SET file extension. Multiple parameter sets can be stored in each file, distinguished by a Set Name.
When you select Save, a dialog box opens. Choose the setup file where you want to save the parameter set and enter the Set Name within the file. Press Save to confirm and store the set in the specified file.
|
|||
Retrieve a parameter set from your setup file. This is useful for running repetitive tests.
Selecting Restore opens a dialog box. Select the setup file (*.SET) where your parameter set is saved and the Set Name within the file. Press Restore to confirm your selection.
|
|||
Accept the parameters currently displayed in the setup dialog box. The setup window closes and Framework proceeds with the next phase of the script. This may be running the experiment or opening a second setup dialog window.
Framework remembers the parameters so they do not have to be re-entered next time.
|
|||
Cancel and close the setup menu without saving any entered parameters. |
|||
Select the instrument and enter the setup parameters for the experiment. |
Most numbers are entered in floating-point format. We recommend that you only enter a decimal point when actually required. For example, enter 1 not 1.0. If you need to enter very large or very small values, use E-format, for example, 1.23E-4 equals 0.0001234. Note that E (upper and lower case) are the only valid letters that may be entered in a number. Unless otherwise noted, all values in the standard techniques are entered in SI units.
On/off switches in the setup are indicated by square check boxes. With the mouse you alter the state of a switch by clicking on the box to activate or deactivate. From the keyboard, tab down until the switch state is enclosed in a dotted line, then press the space bar to change the state. The label for a switch always indicates the current state of the switch, not the state you will get after switching.
Run an experiment
After entering all setup parameters and confirming the input by pressing OK, Framework creates a runner window. The contents of a runner window change as the experiment proceeds, but the window always remains associated with a single experiment and the script running in that window. A runner window can open and close several output files as its script executes but it can have only one file open at a time.

Active runner window during a CV experiment.
Cancel the entire experiment. Use "F1" as shortcut.
After you press ABORT, a dialog box appears. The dialog box asks you if you really wish to terminate the experiment and lose any data not yet written to your computer's disk. A test terminated via ABORT generates a caution message when the data file is loading into the Echem Analyst 2. |
|||
Skip the rest of whatever action is currently running and go on to the next step in the experimental sequence. Use "F2" as shortcut.
If you click Skip during the Conditioning or the Initial Delay of an experiment, the rest of that phase is skipped. Framework closes the runner window if you press Skip after an experiment is completed. |
|||
Pausing any portion of an experiment causes that experiment's timer to stop running. Use "F3" as shortcut.
All time-dependent actions, such as data acquisition, stepping the voltage, or measuring a time delay, stop. The status display changes to Continue when you click the Pause button.
|
|||
Undo the previous Pause command. Use "F3" as shortcut.
The process that was paused is resumed exactly from the point at which it was frozen. |
|||
Select a curve to display in the runner window from a drop-down list. Use "F5" as shortcut.
The list box contains identifiers for each of the displayable curve types. Most experiments generate more than one data curve. For example, the Potentiostatic EIS experiment generates three curves: an open-circuit voltage versus time curve, a real-time curve (Lissajous figure) at the present frequency, and an impedance spectrum.
Get the value of a data point by pointing the mouse at the point and clicking the left mouse button. The x- and y-coordinates of the mouse pointer tip appear at the upper-left corner of a real-time data display. |
You may have more than one runner window open at a time. Each runner window runs one experiment (by running its associated Explain™ script). The runner window stays open as long as the script is running. You can resize and move the runner windows and reduce them to an icon. You control the display of runner windows via the Window menu.
Each runner window can have one or more potentiostats associated with it. When a potentiostat is associated with one window, the potentiostat cannot be selected for use by another until its owner has closed the potentiostat. This is also indicated in the Device status bar with an orange indicator next to the potentiostat label. In general, you must close the first window before the potentiostat is available in another window.
Similarly, a runner window generally has an output file reserved for its data-storage. You must close an output file opened by one window before the output file is available to any other window or program. Most Framework scripts keep their data file open throughout data acquisition.
Related Topics