Description
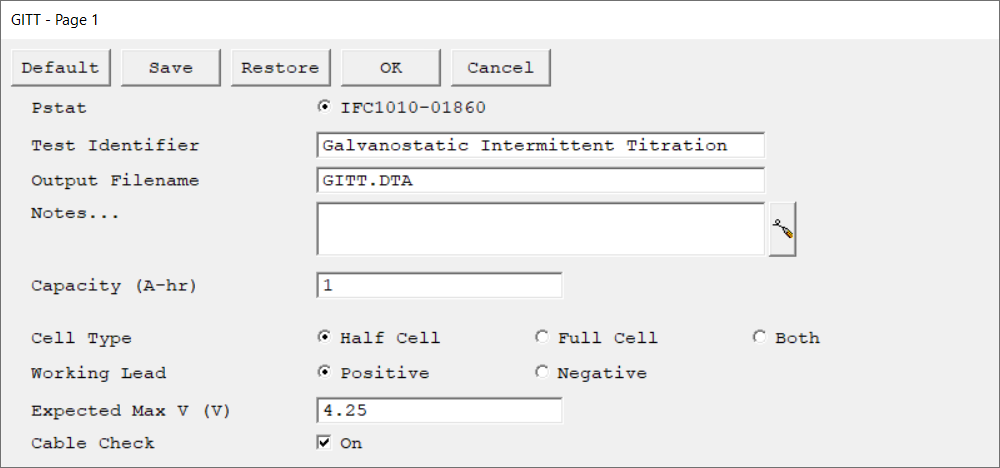
First setup page of the Galvanostatic Intermittent Titration Technique experiment. Press OK to continue to the second setup page.
Parameter |
Description |
Units |
||||||||
|---|---|---|---|---|---|---|---|---|---|---|
Select the potentiostat/galvanostat to perform the experiment. Each radio button corresponds to an installed potentiostat. You can select only one potentiostat at a time. Potentiostats that are already in use are marked with an asterisk. They can be selected but cannot be used. |
|
|||||||||
A string that is used as a name. It is written to the data file, so it can be used to identify the data in database or data manipulation programs. The Identifier string defaults to a name derived from the technique's name. While this makes an acceptable curve label, it does not generate a unique descriptive label for a data set. The Identifier string is limited to 80 characters. It can include almost any normally printable character. Numbers, upper- and lower-case letters, and the most common punctuation characters including spaces are valid. |
|
|||||||||
The name of the file in which the output data are written. By default, it is saved in the default file directory.
|
|
|||||||||
Enter several lines of text that describe the experiment. A typical use of Notes is to record the experimental conditions for a data set.
Notes defaults to an empty string and is limited to 400 characters. It can include all printable characters including numbers, upper- and lower-case letters, and the most common punctuation including spaces. Tab characters are not allowed in the Notes string. Press the Notes button on the right-hand side to open a separate Notes dialog box. |
|
|||||||||
Specify the battery's capacity, i.e., the amount of charge needed to charge or discharge a battery. This value is not used during the experimental phase, but rather during the analysis, where a percent capacity graph can be displayed. |
ampere-hours (A-hr) |
|||||||||
Specify the experiments' cell type, selectable for all instruments:
|
|
|||||||||
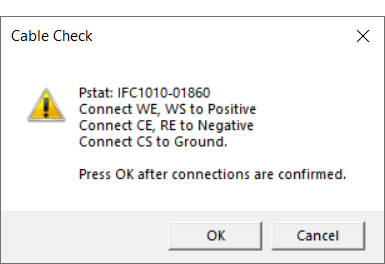
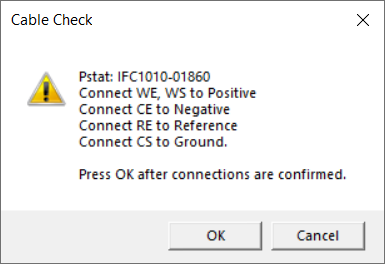
Specify how the potentiostat is connected to the electrochemical cell.
Select Positive when the working lead (green) is connected to the positive electrode (discharge cathode) of the electrochemical cell. Select Negative when the working lead (green) is connected to the negative electrode (discharge anode) of the electrochemical cell.
|
|
|||||||||
The maximum expected voltage which sets the initial voltage measurement range and voltage offset of the galvanostat. If necessary, the voltage measurement range is adjusted during the signal-optimization phase, but this adds extra time to the experiment. |
volts (V) |
|||||||||
Click this checkbox to display a confirmation dialog box before the experiment begins, allowing you verify that the cable connections are correctly configured for the chosen Cell Type.
  |
|

